
Tile Calculator UK: How Many Tiles Do I Need?
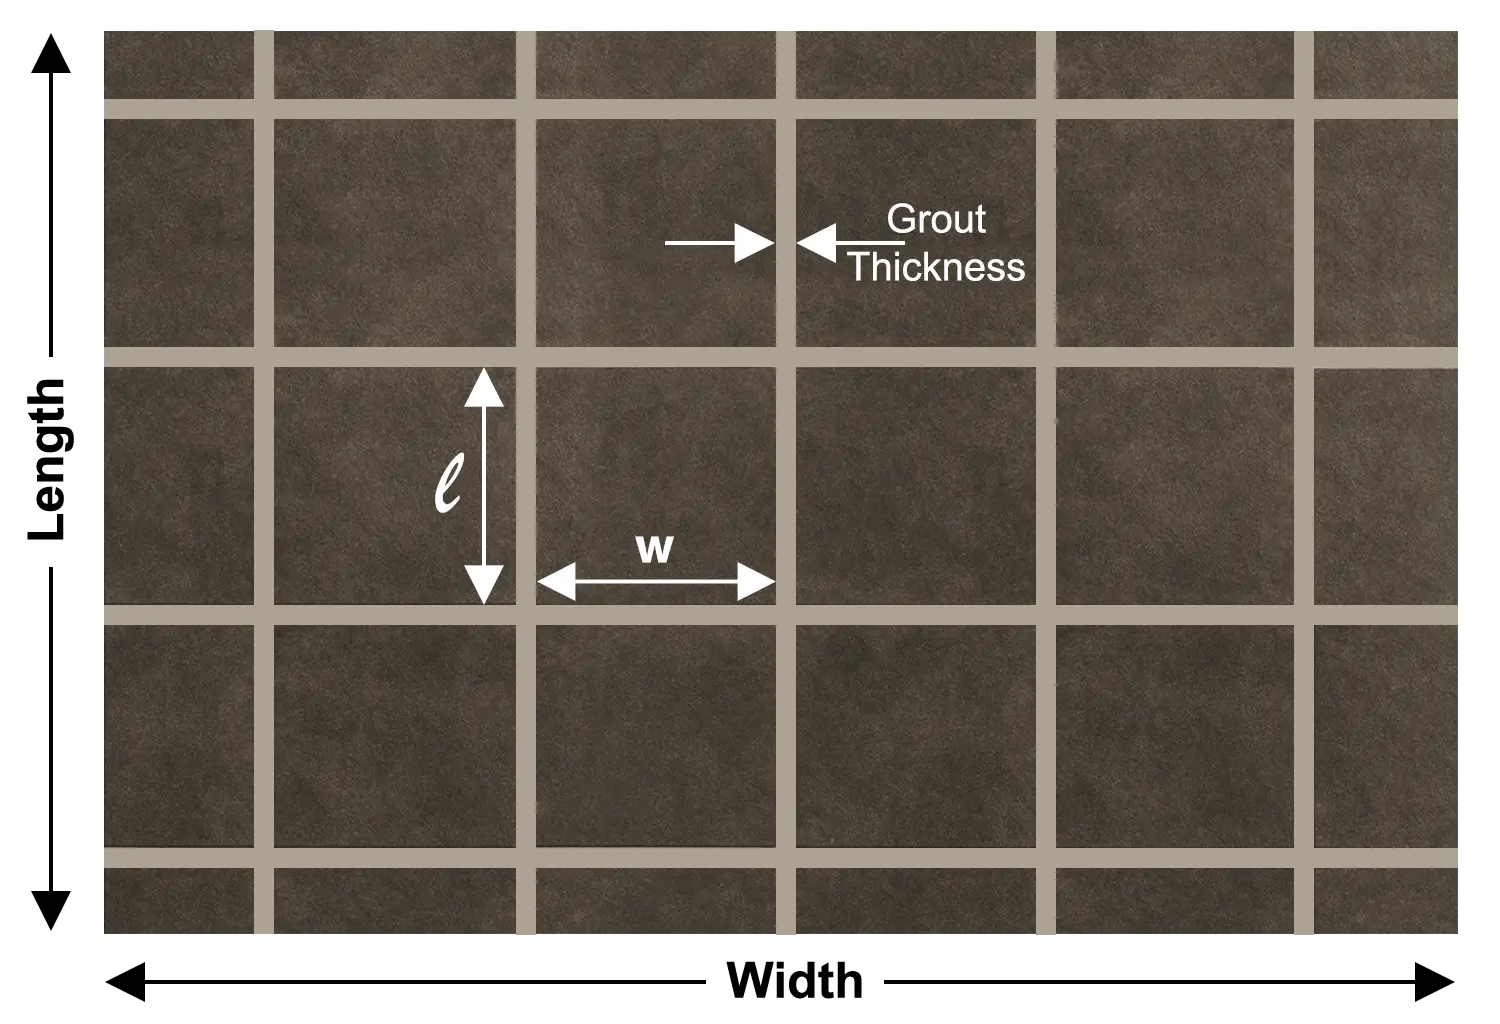
Choose floor or wall, enter your measurements and pick a tile size. This tile calculator then shows tiles per m², the total with wastage, boxes, adhesive, grout and cost.
More free UK building calculators
Work out adhesive and grout next, then plan the walls, floors and groundwork underneath.
Adhesive per m² and 20 kg bags by trowel notch.

Grout per m² from tile size, joint width and depth.

Cubic metres, bags, cement and ballast for slabs and footings.

Sand and cement or liquid screed, with laid cost and drying time.

Litres and tins for rooms, walls, ceilings and exteriors.

Bricks per m², mortar and cost for any wall.
Concrete, breeze and aircrete blocks, with mortar and cost.

Sand, cement and hydrated lime quantities for brickwork, blockwork and repointing.
Why an accurate tile count saves your project
Here is a scene many tilers know well. Your bathroom wall is three rows from finished, and the last box is empty. The shop has more of the same tile, but from a newer batch.
The new tiles are a shade lighter, and the difference shows under bathroom lights. Manufacturers discontinue some ranges within a year, so the matching batch may never return.
Tiles are one material where running short costs more than the tiles themselves. So how much spare is sensible? It depends on the room, the tile size and the layout pattern, which this page explains.
Our rule: buy every box at once and check that each one shows the same batch number. Then keep one spare box for future repairs.
How many tiles per m²?
With a 3 mm joint, you need 2.75 tiles per m² of 600 × 600 mm floor tiles. Metro wall tiles of 300 × 100 mm need about 32.5 per m² with 2 mm joints.
How many extra tiles should I buy?
Add 10% for a straight layout in a simple room. Allow 15% or more for diagonal, herringbone, large-format tiles or rooms with lots of corners.
How to use the floor and wall tile calculator
The whole estimate takes about a minute, and these steps keep the result accurate.
- Choose floor or wall. Wall mode relabels the boxes and adds a box for areas you will not tile.
- Pick dimensions or area. Enter length and width, or type a total area if you already know it.
- Deduct untiled areas. For walls, enter windows, doors, a bath or a shower tray in m².
- Choose a common tile size. The preset list fills the boxes for you, from 600 × 600 floor tiles to metro wall tiles.
- Set the joint and wastage. Floor joints are usually 3 mm and wall joints 2 mm. Then add your wastage percentage.
- Add tiles per box and prices. The calculator turns tiles into whole boxes and totals the cost in pounds.
- Include adhesive and grout if needed. Then download or share the full estimate as an image.
Our advice: measure the room yourself, even when you have architectural plans. Real walls are rarely square, and alcoves or boxed-in pipes add surprising extra area.
Tile calculator formula: how to work out tiles per m²
Every reliable estimate follows the same logic. Measure the area in square metres (square meters, or sqm). Then divide it by the area one tile covers, including its grout joint. Enter tile sizes in mm, cm or metres.
Tiles per m² for popular UK sizes
| Tile size | Typical joint | Tiles per m² | Common use |
|---|---|---|---|
| 1200 × 600 mm | 3 mm | 1.38 | Large-format living and kitchen floors |
| 800 × 800 mm | 3 mm | 1.55 | Open-plan floors |
| 600 × 600 mm | 3 mm | 2.75 | The most popular floor tile |
| 600 × 300 mm | 3 mm | 5.47 | Floors and feature walls |
| 450 × 450 mm | 3 mm | 4.87 | Traditional floor tiles |
| 300 × 300 mm | 3 mm | 10.89 | Smaller floors and utility rooms |
| 400 × 250 mm | 2 mm | 9.87 | Classic bathroom wall tiles |
| 300 × 100 mm | 2 mm | 32.46 | Metro wall tiles |
| 200 × 100 mm | 2 mm | 48.53 | Small metro and splashbacks |
| 150 × 150 mm | 2 mm | 43.28 | Splashbacks and kitchens |
| 100 × 100 mm | 2 mm | 96.12 | Small feature areas |
Before wastage. Calculated with the tool on this page.
Bathroom tile calculator: worked examples for UK rooms
We ran each example through the calculator. Use them to sense-check your own measurements.
Case study 1: bathroom floor
A 2.4 × 1.8 m bathroom floor with 600 × 300 mm tiles and 3 mm joints
Case study 2: bathroom walls, metro or larger tiles?
Bathroom walls of 2.4 × 1.7 m, tiled 2 m high. The door, window and bath area stay untiled.
Here is the surprise. Metro tiles look cheap individually. However, they need roughly three times more fixing time and grout per square metre. Ask your tiler for a price per m² for each option.
Case study 3: kitchen splashback
A 3 m worktop run, tiled 600 mm high with 200 × 100 mm metro tiles
Case study 4: large-format living room floor
A 5 × 4 m open-plan floor with 1200 × 600 mm porcelain tiles and 3 mm joints
Large tiles demand a very flat floor and the right trowel. Our guide to choosing the right trowel for 600 × 600 tiles explains notch sizes.
Floor tile calculator vs wall tile calculator: what changes?
The calculation is identical, yet the practical details differ considerably. These are the points that regularly catch people out.
| Detail | Floor tiles | Wall tiles |
|---|---|---|
| Typical joint | 3 mm (2 mm for rectified porcelain) | 2 mm |
| Usual sizes | 600 × 600 mm and larger | 400 × 250 mm, metro, small formats |
| Adhesive bed | Solid bed, 10–12 mm notched trowel | 6–10 mm notched trowel |
| Main risk | Hollow spots that crack later | Too much weight on the background |
| Extra check | Slip resistance in bathrooms | Background strength and weight limits |
Wall weight deserves particular attention. Industry guidance commonly limits tiles plus adhesive to about 20 kg/m² on plaster. Plasterboard typically allows around 32 kg/m². Heavy porcelain may need a stronger backing board. Standard 1200 × 600 mm tile backer boards cover 0.72 m² each, so you need about 1.4 boards per m². The Tile Association publishes detailed technical guidance, and BS 5385 is the British Standard for wall and floor tiling.
Tiling over a new concrete floor? Size the slab with our concrete calculator, then let it cure properly first. Our concrete cure time guide explains how long to wait.
How much wastage should I add for tiles?
Wastage covers cuts, breakages and occasional faulty tiles. The layout pattern matters considerably more than most people realise.
| Layout | Suggested wastage | Why |
|---|---|---|
| Straight lay, simple room | 10% | Few cuts and little waste |
| Brick bond or offset | 10–12% | More cuts at each end |
| Diagonal | 15% | Every edge tile needs an angled cut |
| Herringbone | 15–20% | Complex cuts along every edge |
| Large-format (600 × 1200 mm +) | 10–15% | One broken tile wastes a lot of area |
| Natural stone | add another 5% | Colour variation needs extra choice |
We think most people under-order on small rooms. A cloakroom with a toilet, basin and boxing wastes a higher share of tiles than a large, open floor. A dry layout before you order shows exactly where those cuts fall.
How much tile adhesive and grout do I need?
Adhesive consumption depends on the trowel notch, while grout depends on the tile dimensions and joint. One 20 kg adhesive bag typically covers 4–5 m² of floor with a 10 mm notched trowel. On walls, a 6 mm notch stretches the same bag to roughly 6–8 m². Our tile adhesive calculator works it out for your notch size.
| Tile size and joint | Approx. grout per m² |
|---|---|
| 1200 × 600 × 10 mm, 3 mm joint | 0.12 kg |
| 600 × 600 × 10 mm, 3 mm joint | 0.16 kg |
| 600 × 300 × 9 mm, 3 mm joint | 0.22 kg |
| 300 × 100 × 7 mm metro, 2 mm joint | 0.30 kg |
| 100 × 100 × 6 mm, 2 mm joint | 0.38 kg |
Grout uses the standard formula: (tile length + width) ÷ (length × width) × joint width × tile depth × 1.6. Our grout calculator runs it for any tile size.
Always use the adhesive and grout coverage printed on your chosen product. Coverage varies between brands, and rapid-set adhesives often cover slightly less.
Tiling cost per m² in 2026: materials and labour
We checked UK retailer and trade price guides in October 2026. Prices vary by brand and region, so treat these as planning ranges.
| Cost item | Typical range (2026) | Notes |
|---|---|---|
| Flexible tile adhesive, 20 kg | £21–£32 | Premium large-format adhesives £40–£50 |
| Cement grout, 5 kg | £13.50–£28 | Epoxy grout costs considerably more |
| Labour, floor tiling | £25–£40 per m² | Large-format and stone cost more |
| Labour, wall tiling | £30–£45 per m² | Metro and mosaic cost more |
| London and South East | about £35–£70 per m² | Day rates often £220–£320 |
Labour figures come from published 2026 trade guides, which vary widely. Always get two or three written quotes.
Here is our honest view. Cheaper tiles rarely save money if they require additional cuts, extra grout and more labour. Compare the total cost per m², not the price per tile.
Where tiling estimates usually go wrong
Our thinking changed here too. We once blamed wastage for short orders, but most problems start before anyone cuts the first tile.
- Mixing batch numbers. Shades vary between production runs. Check every box before you start.
- Forgetting the boxing and reveals. Window reveals, pipe boxing and bath panels all need tiles too.
- Ignoring tiles per box. Shops sell whole boxes, so 27 tiles from boxes of 8 means buying 32.
- Skipping the dry layout. Lay out a row first to avoid thin slivers at doorways and corners.
- Overloading the wall. Heavy porcelain on plaster can exceed safe weight limits. Check the background first.
- Throwing away spares. Keep a box for repairs, because ranges often disappear within a year or two.
Cutting tiles creates fine silica dust, so use water suppression or extraction. HSE explains the risks in its construction dust guidance. If tiles already sound hollow, read our guide to checking hollow tiles before repair.
Tile calculator FAQs
How our tile calculator works out the figures
The calculator converts every measurement to metres, then subtracts any areas you will not tile. It divides the remaining area by the tile module, which is the tile plus its joint on two sides. It rounds up, adds wastage, then rounds up again to whole boxes.
Every case study on this page came straight from the calculator. Prices reflect UK retailer listings and trade guides checked in October 2026.
Think back to that bathroom wall three rows short. Buying every box at once, with sensible wastage, avoids the mismatched batch. Figures checked in October 2026. Treat results as estimates and check your tile and adhesive data sheets.
Which room are you tiling next? Tell us about your project or ask a question through our contact page. We read every message, and good questions often shape future guides.