How to Build a DIY Fire Pit: The Ultimate Guide
Introduction:
Building a backyard fire pit is about a lot more than just stacking up stones. It is about creating a place for real connection, making s’mores at midnight, and enjoying quiet moments under the stars. But after spending twenty years working in the dirt, I have seen way too many people treat a building project like a total guessing game. Guessing your material counts doesn’t just lead to three extra trips to the big-box store; it often results in structural failure or worse, using standard clay bricks that can crack or explode under thermal expansion.
In the US, most homeowners aim for a 36-to-44-inch diameter pit to balance heat output with conversation. To build a structure that outlasts your mortgage, you need to move from “eyeballing it” to a data-driven approach. By using a precise Brick and Block Ring Calculator, you can determine exact requirements for Modular Fire Bricks, Refractory Cement, and Pea Gravel drainage, ensuring your “weekend project” becomes a permanent landmark on your property
Planning & Legal: “The Boring but Vital Stuff
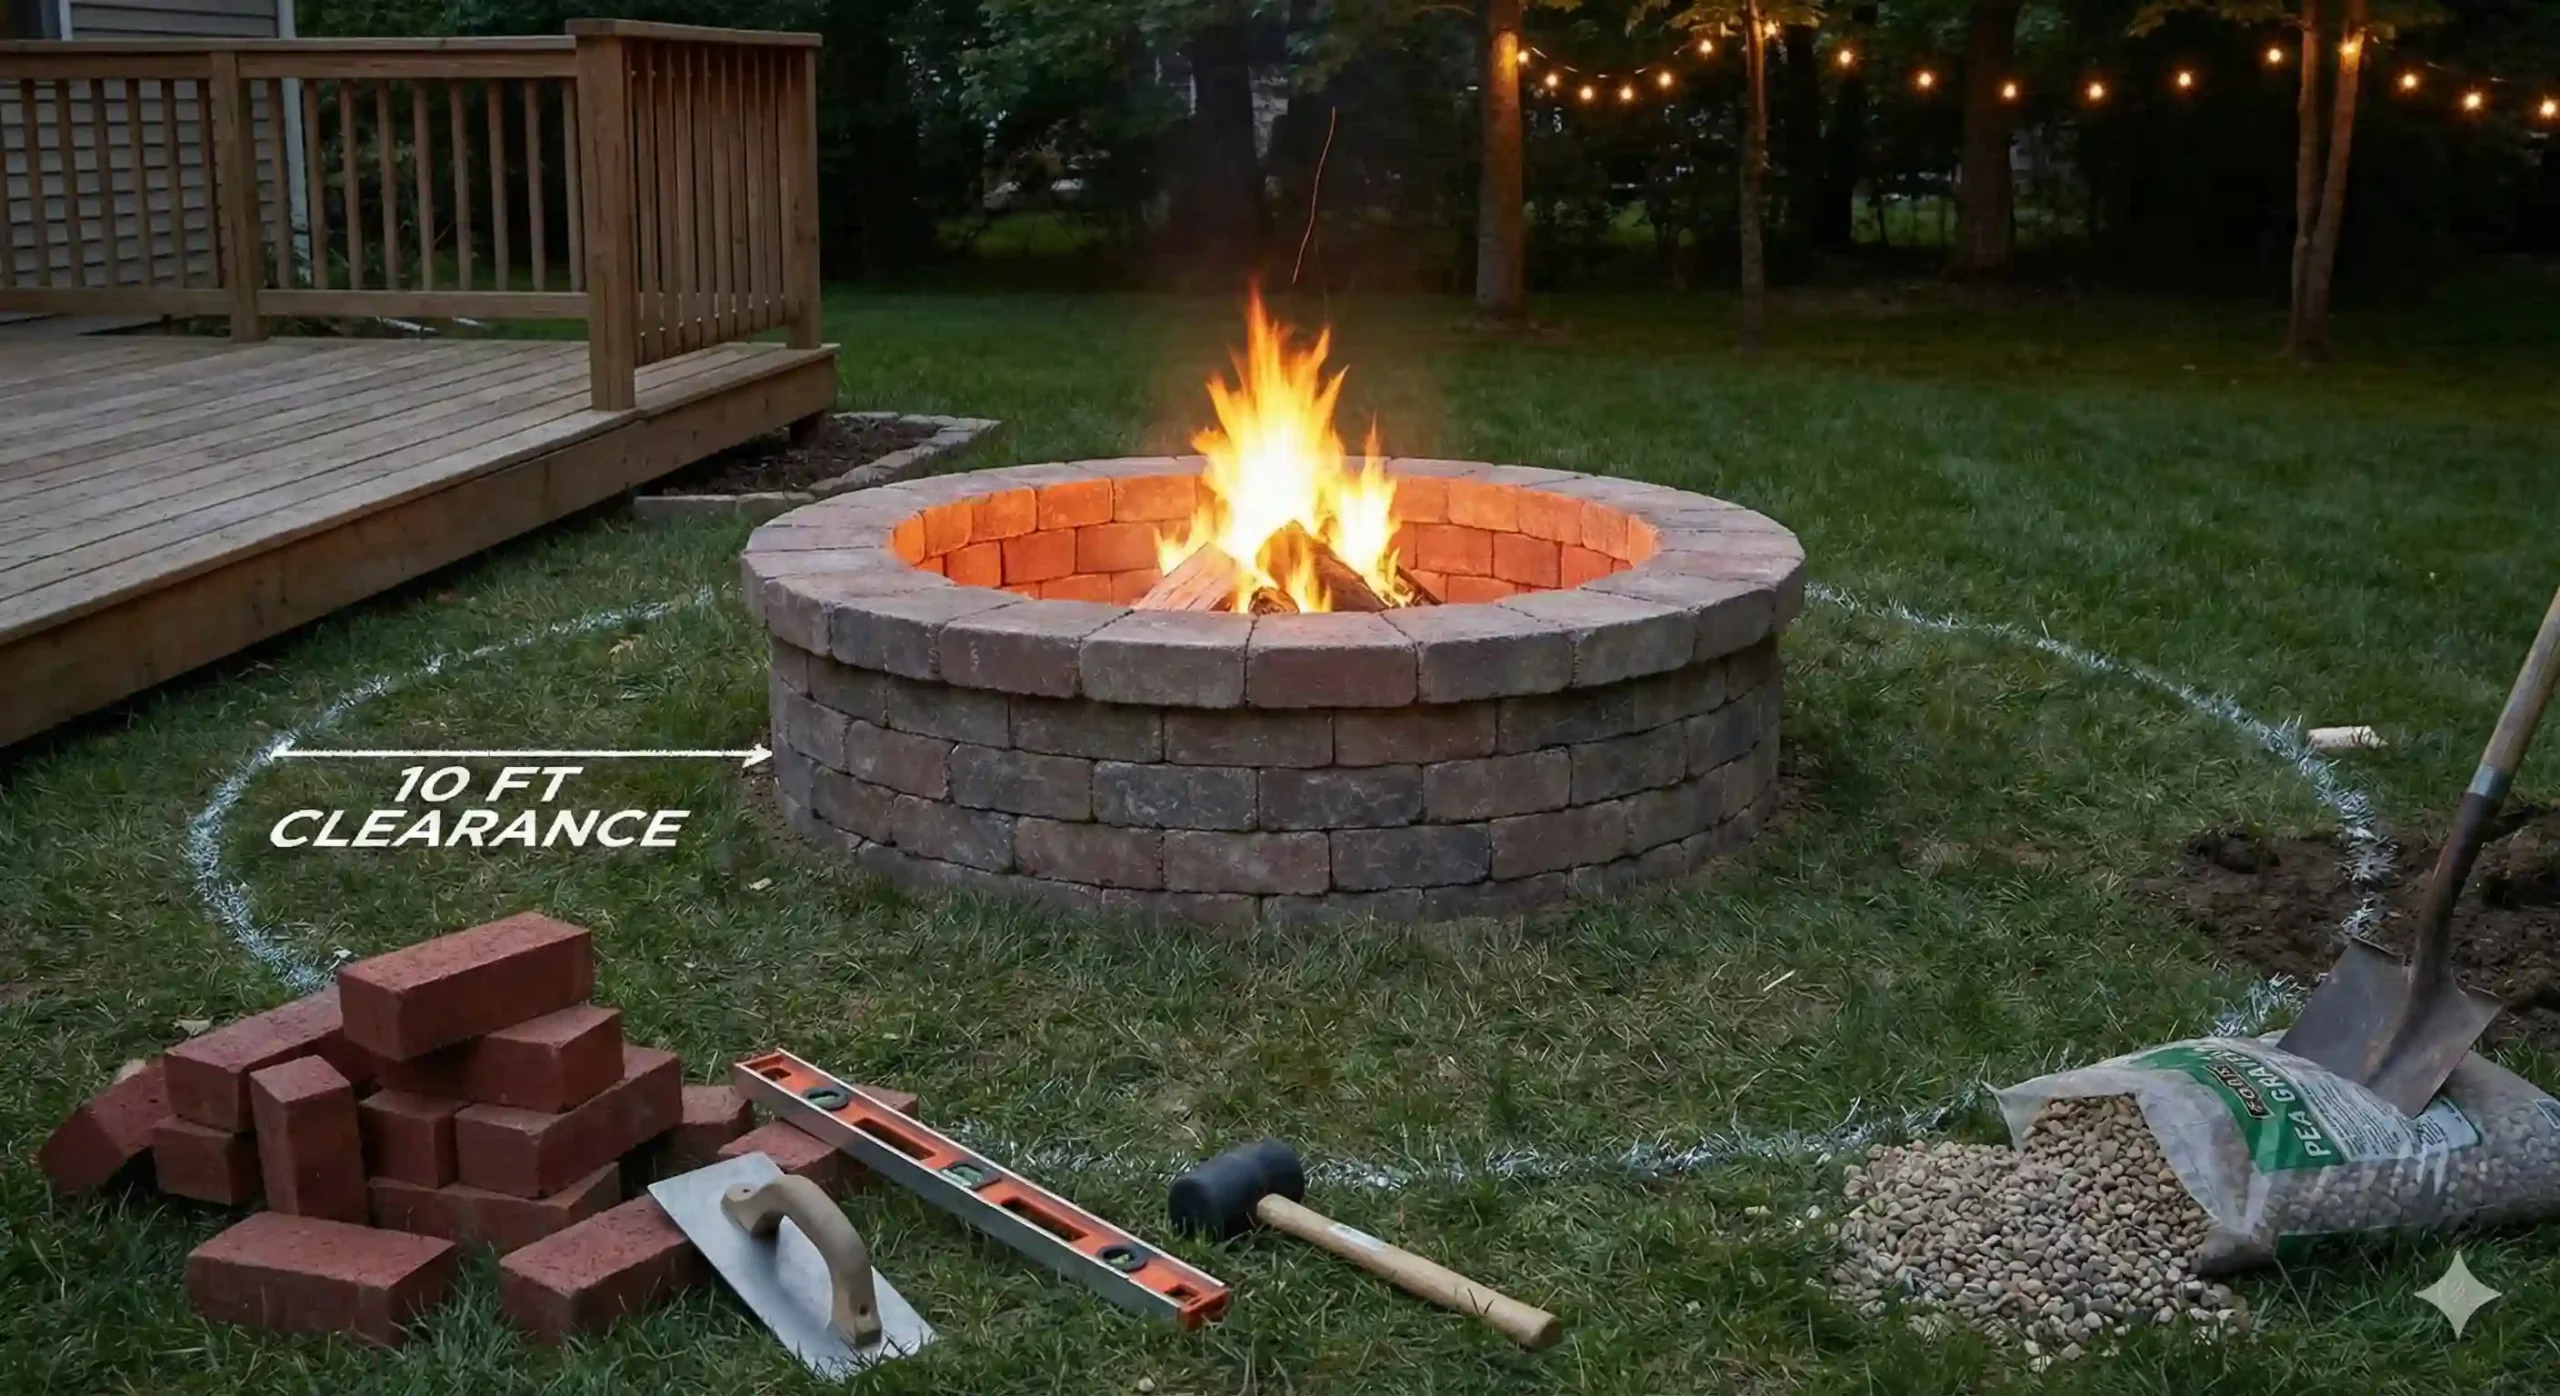
Look, I know the planning phase is boring, but skipping it is exactly how accidents happen. As a general rule, you need to pick a flat spot that is a good 10 to 25 feet away from your house, patio furniture, and any overhanging trees.
Before you even think about grabbing a shovel, you absolutely must call 811. That is the free national service here in the States that comes out and marks your underground utility lines. Hitting a gas pipe or a buried cable will completely ruin your project and cost you a massive fine.
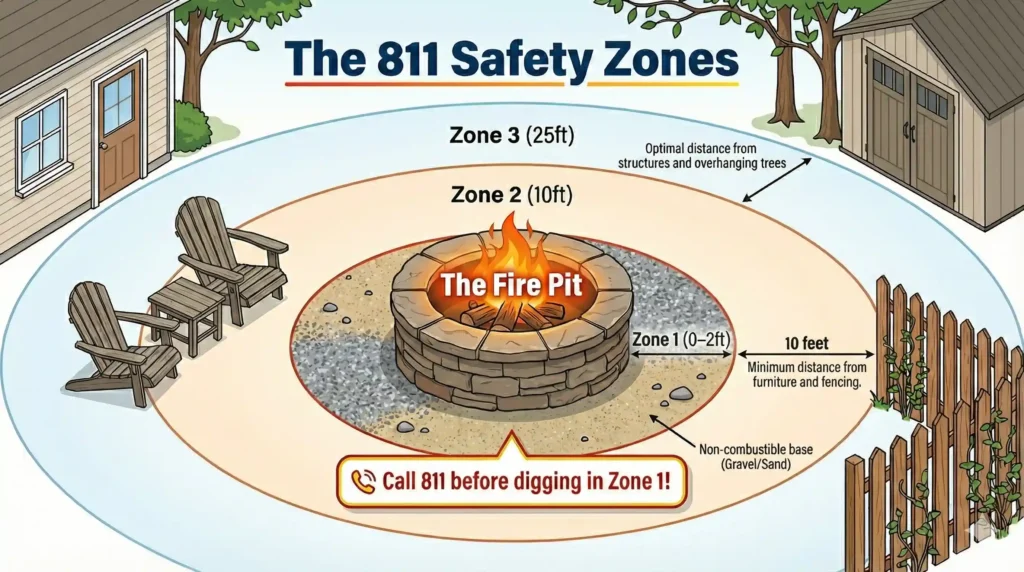
Finally, check with your local city hall or your Homeowners Association before you buy a single brick. You need to find out if their local codes allow an in ground fire pit or if you are strictly required to build an above ground design. Getting the official green light first saves you from having to tear down all your hard work later.
The Anatomy of a Fire Pit
When I pull up to a backyard job, I always explain a fire pit like it is a three part system. You got the guts, the shell, and the footing. If you mess up any of these, you will be calling a guy like me to fix it next spring. Let us break down exactly what goes where.
The Guts: Your Interior Lining
- What to buy:
Kiln fired fire bricks. You might also see them called refractory bricks at the supply yard. - Why it matters:
This is the absolute biggest mistake I see DIY folks make. They use regular clay bricks on the inside. Regular bricks have air pockets and trap moisture. When that moisture hits a couple hundred degrees it turns to steam and expands. Best case scenario your brick cracks. Worst case, it literally explodes while you are sitting right there. True fire bricks are baked in a kiln to handle crazy heat, usually up to 2,000 degrees Fahrenheit. They take the beating so the rest of your pit survives.
Feature | Standard Face Brick |
Heat Resistance | Up to ~500°F (can crack) |
Porosity | High (traps moisture/explodes) |
Best Use | Exterior decoration |
Price | Affordable |
The Shell: Your Exterior Wall
- What to buy:
Standard face bricks, concrete blocks (CMUs), or stone pavers. - Why it matters:
Since the inside fire bricks are handling all the actual fire, the outside is really just for looks and structure. You do not need to spend big money on heat resistant stuff out here. You can just pick up normal face bricks or heavy concrete blocks that match your patio. It saves you cash and makes the whole yard look like it was designed together.
The Footing: The Base
- What to buy:
A whole lot of pea gravel, crushed stone, or bags of concrete mix. - Why it matters:
Dirt shifts. If you just stack heavy bricks on soft topsoil, your pit is going to sink and look crooked after the first big rain storm. For a basic weekend build you want to dig down a bit and pack in a thick layer of pea gravel. That gives you great water drainage so the pit does not fill up like a bathtub. But if you want a rock solid permanent build that will survive winter freezes without moving an inch, pouring a real concrete footing is the way to do it. If you go this route, stop guessing how many bags to buy and just punch your dimensions into our concrete calculator first.”
Material List & Tool Kit
Before we start throwing dirt let us get your shopping list sorted. You do not want to be that guy making five runs to the hardware store in one afternoon. Here is exactly what I keep in my truck for a job like this.
The Essential Tool Kit
Tool | Why You Need It |
Digging Shovel | You need a solid spade to clear out the grass and dig your pit to the right depth. |
Spirit Level | This is non-negotiable for keeping every single layer flat and even as you build up. |
Rubber Mallet | Use this to gently tap the bricks into place so they set tight without cracking. |
Mason’s Trowel | You will use this to scoop and spread your mortar or adhesive onto the bricks. |
The Consumables (What gets used up)
Material | The Pro Details |
Type N Mortar | We use this specific mix to bond the exterior face bricks together. |
Refractory Cement | This stuff comes pre mixed in a bucket and has a consistency just like peanut butter. |
Rebar (3/8 inch) | If you are pouring a concrete footing, bend this metal bar into a ring to reinforce the base. |
Pea Gravel | You will need bags of this for the bottom layer to help with water drainage. |
The “Math of Masonry”: How Much Do You Really Need?
Look, I know nobody likes doing homework on a weekend project. But do you know what is worse than doing a little math? Driving all the way back to the supply yard in the middle of a job because you are exactly three bricks short. I have seen it happen a hundred times. To get this right, you have to understand the shape you are building.
First, you need your Diameter, which is just the distance straight across the middle of your circle. Then you need the Circumference, which is the total distance all the way around the outside ring. The old schoolhouse formula for this is simple enough. You take your diameter and multiply it by 3.14 to get that circumference. Once you have that total length, you divide it by the length of one brick to see how many you need for a single layer.
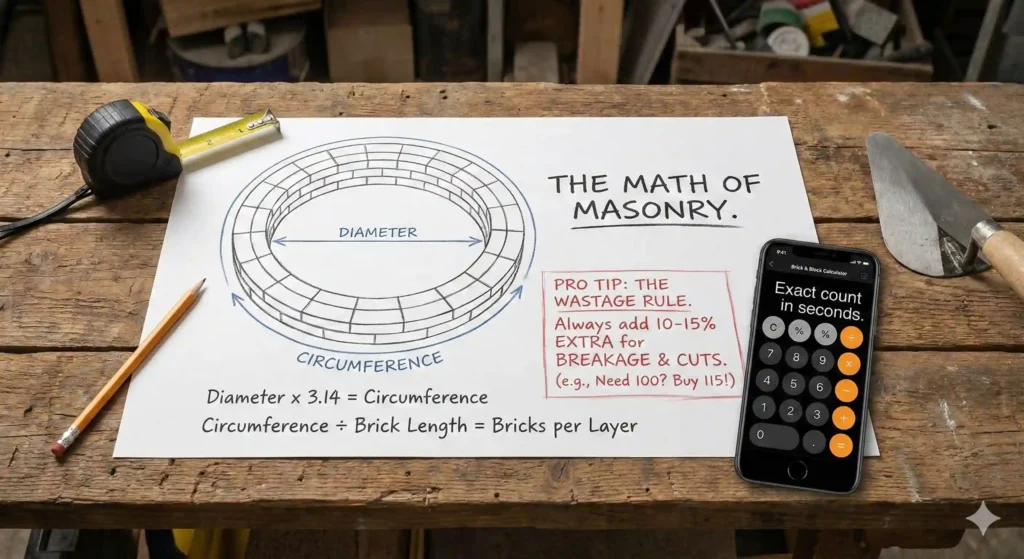
Here is the rule that separates the pros from the first timers. Never buy the exact number the math gives you. If the paper says you need 100 bricks, you go ahead and buy 110 or 115. We call this wastage. You are going to drop a brick, crack one with your hammer, or just mess up a cut. It happens to the best of us. Standard practice is to always add 10 to 15 percent extra to your order to account for breakage and cuts.
Honestly, save yourself the headache. Don’t do the math by hand. Use our Brick & Block Calculator to get your exact count in seconds.
Step-by-Step Construction Guide
This is where the rubber meets the road. We have our plan and our materials so let us start building. Here is how to throw this pit together step by step.
Step 1: Marking and Excavation
Do not try to eyeball this circle. It never ends well. The easiest way to get a perfect ring is the old stake and string trick. Drive a metal stake right into the dead center of where you want the pit. Tie a string to it cut to the exact length of your radius. Walk around in a circle keeping the string pulled tight and mark the ground with some bright spray paint. Once you have your circle marked grab your spade and dig that whole area down about six to eight inches deep.
Step 2: The Foundation
Once the dirt is out you need to get the bottom flat and hard. Take a heavy hand tamper and pound that soil down until it feels solid beneath your feet. If the dirt is soft your heavy bricks will sink later. Next dump in about four inches of pea gravel and rake it smooth. This stone layer is crucial because it lets rainwater drain away into the ground instead of turning your new fire pit into a soup bowl.
Step 3: Lining the Pit
Now we build the guts that handle the heat. Mix up your refractory cement in a bucket until it feels like peanut butter. We are going to lay the inner fire bricks in what masons call a soldier course. That just means standing them up on their narrow ends tight against each other. Why do we do it this way? Because it is a whole lot easier to make a smooth curve with skinny upright bricks than laying them flat. Butter the sides with your cement and set them tightly together in a ring right on top of the gravel base.
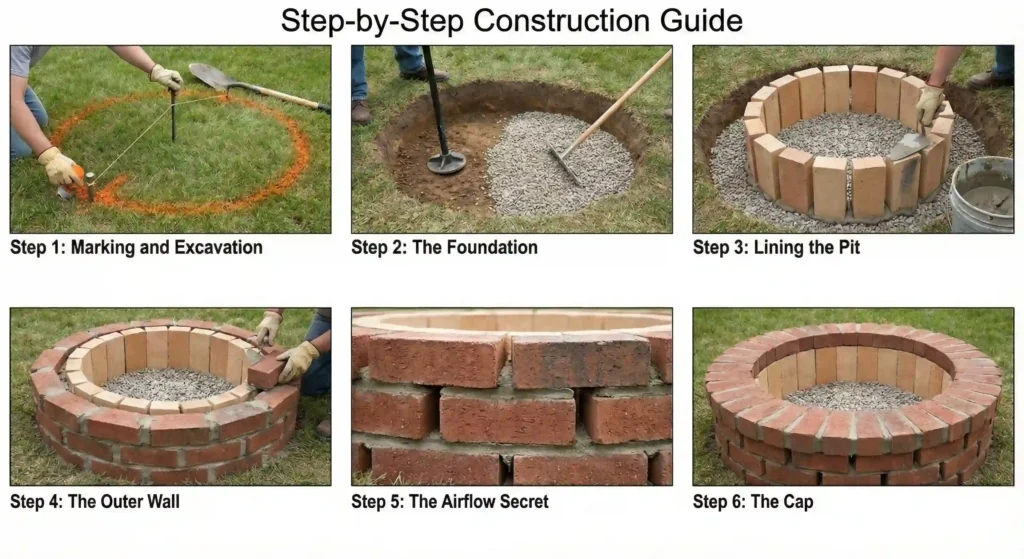
Step 4: The Outer Wall
With the inner ring finished you can start on the decorative outer shell using your regular face bricks and standard mortar. Lay the first ring flat on the gravel base around your inner fire bricks. For the layers on top of that you want to use an offset pattern. Some folks call this a running bond. Basically make sure the middle of a brick sitting on top lines up directly over the seam between the two bricks below it. This locks the whole wall together and makes it much stronger.
Step 5: The Airflow Secret
Here is the trick that keeps your fire pit from turning into a smoke machine. Fire needs oxygen to burn hot. On the second layer of your outer wall leave a finger sized gap between bricks every couple of feet all the way around. Do not put mortar in these gaps. These are called draw holes. They suck fresh air into the base of the fire so it burns clean and keeps smoke out of your face.
Step 6: The Cap
Time for the finishing touch. The top layer is called the cap. A great way to top it off is with a row lock course. That means laying the bricks on their edges pointing inward like spokes on a wheel. This looks professional and gives you a nice wide rim. More importantly it acts like a roof over the wall so rain does not soak into the joints and freeze during the winter.
Curing & The First Fire
Alright the pit is built and it looks fantastic. I know exactly what you want to do right now. You want to grab a stack of firewood and light it up tonight. Do not do it. This is the single hardest part of the whole project for most folks. Patience is absolutely key here. That mortar and refractory cement needs time to cure completely all the way through. It might feel dry to the touch in a few hours but deep down it is still holding moisture. If you light a hot fire right now that trapped water turns into steam and it will pop your brand new joints right apart. You need to wait at least a full twenty four hours for a small test fire but honestly give it a solid week if you can just to be safe.
Frequently Asked Questions (FAQ’s)